Google Meet add-ons are apps embedded directly into a meeting, in the side panel or on the main stage, so participants can collaborate or pull in outside tools without leaving the call. You find them two places: the Activities panel inside an active meeting, and the Google Workspace Marketplace for a wider catalog. If you just need a quick poll or attendance count, stick with Meet’s built-in activities. If you need something persistent, like collaborative notes, a whiteboard, or a real-time sales coaching feed such as CoachMode, that’s when an add-on earns its place.
Two quick signals decide which route to take:
- Simple, one-off task (poll, Q&A, headcount): use a built-in Meet activity, no install required.
- Ongoing workflow or outside data (CRM sync, transcription, live coaching cues): install an add-on built on the Meet add-ons SDK.
Key Takeaways
Google Meet add-ons extend calls with embedded apps installed through the Activities panel or Marketplace, while built-in activities cover most routine meeting needs without any install at all.
| Point | Details |
|---|---|
| Install location | Add and manage add-ons through the in-meeting Activities panel or the Google Workspace Marketplace. |
| Check admin policy first | Workspace admins can block or pre-approve add-ons, so a missing feature is often a policy setting, not a bug. |
| Use built-ins for simple tasks | Polls, Q&A, and attendance tracking need no install and already generate automatic reports. |
| Reserve add-ons for persistent workflows | Choose an add-on like CoachMode when you need ongoing data or coaching throughout the call, not a one-off task. |
| Developers start with the manifest | Get addOnOrigins, sidePanelUrl, and logo fields right before troubleshooting deployment errors. |
Table of Contents
- Who Can Use Google Meet Add-Ons?
- How Do You Install Meet Add-Ons?
- How Do Hosts and Guests Start an Add-On Activity?
- Why Isn’t My Add-On Working?
- Which Meet Add-Ons and Activities Are Actually Worth Using?
- How Do You Build a Meet Add-On? A Developer Quickstart
- Built-In Features or a Dedicated Add-On: Which Do You Actually Need?
- Sources
Who Can Use Google Meet Add-Ons?
Not every account can see the Activities panel or install an add-on, and it’s rarely a bug when they can’t. You need a signed-in Google Account in good standing. Accounts under Family Link supervision or certain under-13 education accounts are commonly restricted from add-on access entirely.

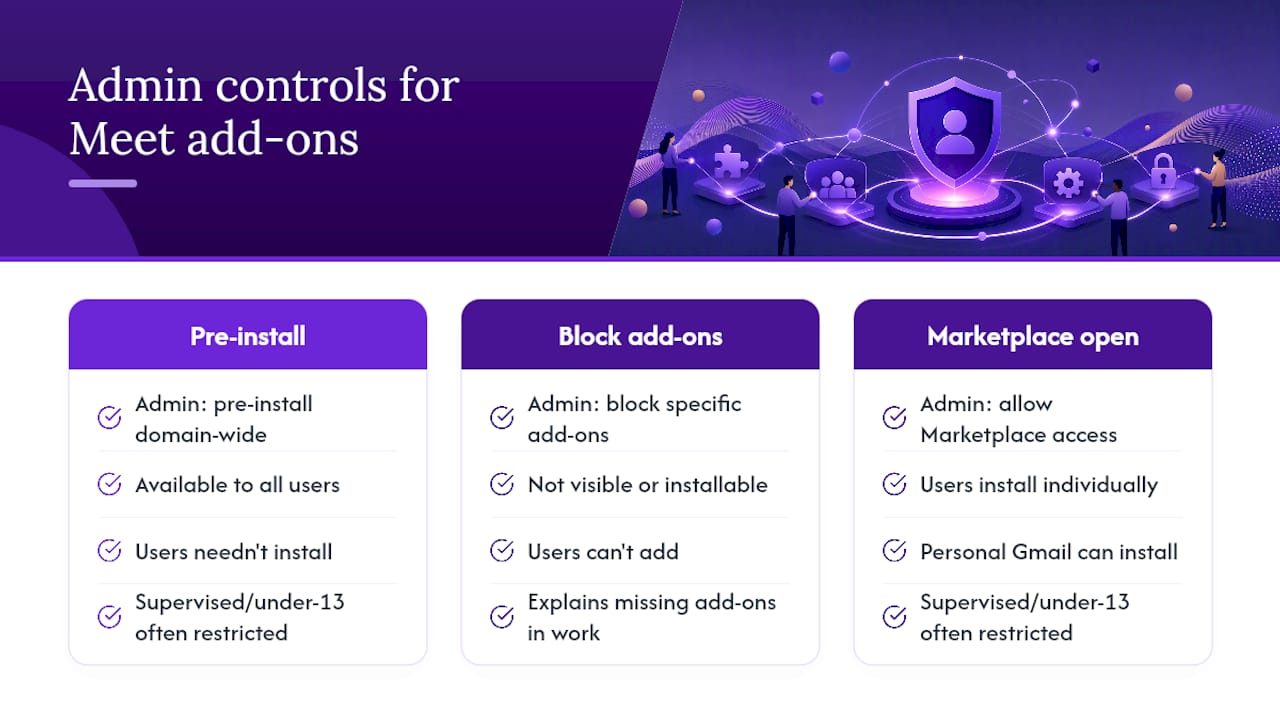
Workspace admins also control the door. They can pre-install add-ons for the whole domain, block specific ones outright, or leave the Marketplace open for anyone to add on their own. If your company account can’t find an add-on that a personal Gmail account sees fine, that’s almost always an admin policy setting, not something broken on your end, according to Google’s Meet support documentation.
Meeting role matters too. Guests joining in view-only mode, such as through a livestream link, typically can’t launch or interact with add-on activities the way a full participant can.
Pro Tip: If the Activities icon is missing entirely, check three things in order: you’re signed into the right Google Account (not a secondary personal one), your organization hasn’t blocked the Marketplace, and you’re not joining as a livestream viewer.
How Do You Install Meet Add-Ons?
Installing an add-on takes under a minute once you know where to look, whether you’re starting from inside a live call or browsing the Marketplace first.
From inside a meeting:
- Click the Activities icon in the meeting toolbar.
- Browse featured add-ons or select “Search apps” to open the Marketplace directly.
- Choose an add-on, review the permissions it requests, and confirm.
- Complete any OAuth consent screen (Google will ask you to confirm account access and specific data scopes).
- The add-on appears in your side panel, ready to launch.
From the Marketplace directly:
- Go to the Google Workspace Marketplace and search for the add-on by name.
- Click Install, pick the Google Account to associate it with, and accept the permissions.
- Open Meet, start or join a call, and the add-on shows up under Activities automatically.
A few compatibility notes worth knowing before you start:
- Add-ons run inside Meet’s own container, so they generally work the same on any modern desktop browser, but mobile app support varies by add-on.
- A separate category, browser extensions from the Chrome Web Store, modifies the page itself rather than embedding through Meet’s SDK, and it only works in Chrome.
- If installs stall or the Marketplace won’t load, check that third-party cookies aren’t blocked in your browser settings.
How Do Hosts and Guests Start an Add-On Activity?
A host launches an activity from the Activities panel, and by default, participants can join in without a separate install if they’re already signed into a compatible Google Account. If a guest doesn’t have the add-on yet, Meet typically prompts them to install it with one click when they try to join the activity.
Where the activity displays depends on what it’s doing:
- Lightweight tools (a quick poll, a small widget) usually stay in the side panel, next to the video grid.
- Richer, collaborative tools (a shared whiteboard, a document, a live coaching dashboard) often expand to the main stage, replacing the video grid as the visual focus.
Developers can also trigger an add-on automatically during screen sharing using a method called exposeToMeetWhenScreensharing(), which surfaces the relevant add-on the moment someone shares a matching site or document.
Common real-world patterns include a team taking collaborative notes during a planning call, a teacher running a shared whiteboard for a lesson, or a sales rep running CoachMode’s live objection-handling panel quietly in the side panel while the client-facing conversation stays front and center.
Why Isn’t My Add-On Working?
Add-ons hit walls in a few predictable spots. Meetings with client-side encryption enabled, live-streamed sessions, and certain under-age or restricted accounts commonly block add-on functionality outright, according to Google’s official Meet documentation. Beyond those hard limits, most problems are configuration issues, not real failures.
- Blocked third-party cookies stop the Marketplace and some add-ons from loading correctly.
- A missing Activities button is frequently an admin-level restriction rather than a bug on your device.
- Mixed compatibility between mobile and desktop can make an add-on appear on one and gray out on the other.
Run through this before contacting support: confirm you’re signed into the correct account, re-check cookie settings, review what permissions the add-on actually requested, and try a clean uninstall and reinstall.
Pro Tip: Before approving any add-on for your team, read the permission screen carefully. Add-ons that request calendar or contact access are doing more than the meeting itself requires, and that’s worth a second look.
On the privacy side, add-ons only access what you explicitly consent to during the OAuth prompt. Unlike browser extensions, which run client-side and can quietly inject code into the page, add-ons are integrated through Google’s server-side SDK, which tends to make their permissions more transparent and predictable.
Which Meet Add-Ons and Activities Are Actually Worth Using?
Not every meeting needs a third-party tool. Google’s built-in activities already generate attendance reports emailed automatically to organizers, which covers a lot of routine meeting management without installing anything.
Here’s how to think about the categories:
- Built-in activities: polls, Q&A, and attendance tracking. Best for meetings with many guests where you just need a quick read on the room.
- Visual collaboration add-ons: shared whiteboards and diagramming tools. Best for teaching sessions or design reviews where the main stage needs to show work, not faces.
- Transcription and AI notes: live captioning or note-generating add-ons. Best for record-keeping when you need a written trail after the call ends.
- Sales coaching and live cueing: a side-panel tool like CoachMode that listens to the conversation and surfaces objection responses in real time. Best for sales demos and high-stakes closing calls.
- Meeting management extensions: Chrome-based tools for auto-mute or UI tweaks. These live in the Chrome Web Store rather than the Meet add-ons SDK, since they modify the browser locally instead of embedding through Meet itself.
If your need is basic headcounts or a show of hands, don’t install anything. Save add-ons for workflows that need to persist beyond a single question.
How Do You Build a Meet Add-On? A Developer Quickstart
Building a Meet add-on comes down to four moves: enable the right APIs, write a manifest, deploy it, and test it inside a live meeting. The Meet add-ons SDK is built around two placement concepts, the side panel for lightweight persistent tools and the main stage for anything that needs the full visual focus of the call.
- In Google Cloud Console, enable the Google Workspace Marketplace SDK and the Meet Add-ons API for your project.
- Write your manifest, defining how your app identifies and appears inside Meet.
- Choose a deployment path: HTTP deployment for a production web app, or Apps Script deployment for a faster internal prototype.
- Create the deployment and submit your
DEPLOYMENT.JSONmanifest file. - Install the unpublished add-on to your own developer account for testing.
- Start a meeting at meet.google.com and confirm the add-on appears in the Activities panel.
Your manifest needs a handful of essential fields to render correctly inside Meet:
{
  "common": {
    "name": "My Meet Add-on",
    "logoUrl": "https://example.com/logo.png",
    "darkModeLogoUrl": "https://example.com/logo-dark.png"
  },
  "meet": {
    "web": {
      "sidePanelUrl": "https://example.com/side-panel"
    },
    "addOnOrigins": ["https://example.com"]
  }
}
Getting addOnOrigins wrong is one of the most common deployment errors. If your side panel is hosted across multiple subdomains or a CDN, every origin serving assets needs to be listed, or the add-on simply won’t load inside Meet.
Google’s own deployment guide recommends HTTP deployment for anything going to production, reserving Apps Script for quick internal tools where you don’t need the overhead of a full web deployment.
The gap between a working prototype and a published add-on is almost always the manifest, not the code. Get your origins, logo URLs, and side panel URL exactly right before you touch anything else.
Pro Tip: Test your CORS headers before you test anything else. A misconfigured origin is invisible in your own browser console but will silently break the add-on the moment someone outside your dev environment tries to load it.
For in-meeting behavior, the startActivity() method is what actually launches your add-on into the meeting, and it’s worth studying alongside the screen-share promotion API if your tool is content-specific.
Built-In Features or a Dedicated Add-On: Which Do You Actually Need?
Most teams over-install. If a poll or a quick Q&A gets the job done, use Meet’s native activity and skip the Marketplace entirely; those built-ins already hand organizers attendance data automatically, no third-party permission grant required. Add-ons earn their place when the workflow needs to persist or pull in outside data, like a CRM sync or a coaching layer that has to listen through an entire call. Before deploying anything organization-wide, weigh the admin policy and data access against the actual gain. A live coaching tool like CoachMode is a good example of an add-on that justifies the permission grant, because the value only exists while the call is happening, not after.
Sources
- Use add-ons with Google Meet – Computer
- Deploy a Meet add-on | Google Meet | Google for Developers
- Attendance reports and meeting activity features (Google Workspace Help)